How To: 3D PRINT
The 3 most commonly used systems are Fused Deposition Modelling or Fused Filament Fabrication (FDM or FFF), Plaster-based 3D Printing (PP) and Selective Laser Sintering (SLS). Additionally, Stereolithography (SLA) and Digital Light Processing (DLP) are currently on the rise. Depending on the process used the geometry needs to be prepared in a certain way.
See the 3D Printing wikipedia page for an extensive overview and detailed information.
or 3DPI’s “The Free Beginner’s Guide to 3D Printing”
Each system also has its pros and cons regarding speed, accuracy (detailing), strength (application), surface finish, material properties and cost. Ideally you choose the best suited process depending on the desired endresult…or by its availability:
3D Printing at the IoA:
Each of the 3 architecture Studios (Hadid, Lynn, Rashid) is equipped with one Makerbot Replicator 2 (FDM/FFF) and students have the possibility to use the zPrinter 310 (PP) in the Production Lab. The Energy Design Department of the IoA is now working with one Formlabs Form1 Printer (SLA).
3D Printing services/locations in Vienna:
3dee.at (FDM)
3d-druck-wien.at (PP, MJM)
happylab (FDM, with membership)
3D Printing online service:
Shapeways (kind of all processes available)
If you want to print either at shapeways or at any of the Viennese location check with them on how to prepare the printfile.
______________________________________________________________________________________________________________
zPrinter 310 (PP)
Preparing a file for our powder printer is fairly easy…
…just make sure that:
- – file-units are millimeters
- – each object is a closed solid with no naked edges (watertight)
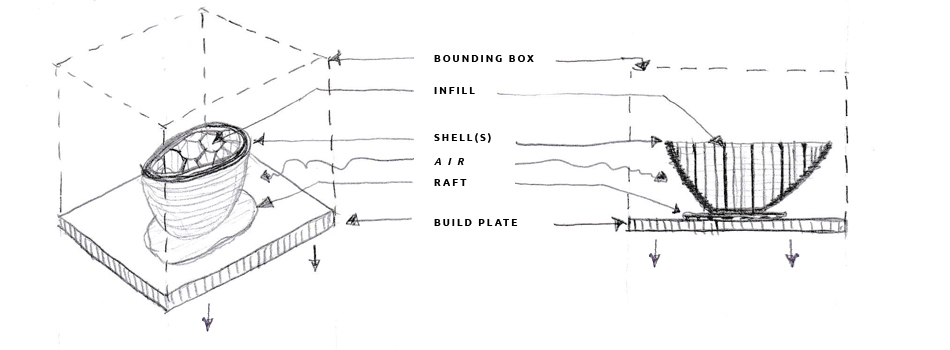
- – geometry fits inside the boundingbox -> machine data
- – file format is .STL
HOW the printer prints:
The ZPrinter first spreads a layer of powder in the same thickness as the cross section to be printed. The print head then applies a binder solution to the powder, causing the powder particles to bind to one another and to the printed cross-section one level below. The feed piston comes up and the build piston drops one layer of the thickness. The printer then spreads a new layer of powder and repeats the process, until the entire part is printed…
HOW to prepare the geometry:
The easiest way is to import it into either Autodesk MAYA or 3DStudio Max and “shell” it inwards with a minimum wall-thickness of 1.5mm (thinner walls will break too easily (on your own risk you can print thinner, but in that case you will be fully charged for a misprint) thicker walls will produce a more stable result).
Big closed solids will contain the unsolidified powder (which luckily acts as a supporting structure and therefore all cantilevering forms can be print), we therefore recommend to add an “escape hole” somewhere hidden, if your geometry doesn’t provide openings already.
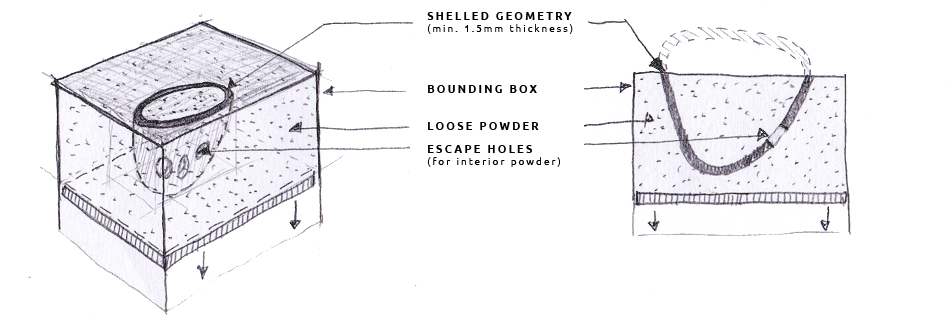
As 3Dprints from the zPrinter are charged by weight, removing loose powder from the interior will also make it lighter and therefore cheaper…
After removal of all loose powder you will be provided with a special liquid you can apply with a standard brush to make it more sturdy.
______________________________________________________________________________________________________________
MAKERBOT REPLICATOR 2 (FDM)
Firstly familiarize yourself with the concept of gravity….because printing on a Makerbot Replicator 2 or a similar machine requires a bit more thinking than printing on the zPrinter Powder Printer (or e.g. a laser-sintering machine)….
- – file-units are millimeters
- – each object is a closed solid with no naked edges (watertight)
- – all geometry is not cantilevering in an angle more than 45 degrees and horizontal bridges are not spanning wider than 10mm
- – geometry fits inside the boundingbox -> machine data
- – file format is .STL
HOW the printer prints:
The model or part is produced by extruding small beads of thermoplastic material to form layers as the material hardens immediately after extrusion from the nozzle.
A plastic filament is unwound from a coil and supplies material to an extrusion nozzle which can turn the flow on and off.
The nozzle is heated to melt the material. The thermoplastics are then deposited by an extrusion head. The nozzle can be moved in both horizontal and vertical directions and the part is built from the bottom up, one layer at a time.
Although as a printing technology FDM is very flexible, and it is capable of dealing with small overhangs by the support from lower layers, FDM generally has some restrictions on the slope of the overhang, and cannot produce unsupported stalactites.
Myriad materials are available, such as ABS, PLA, polycarbonate, polyamides, polystyrene, lignin, among many others, with different trade-offs between strength and temperature properties. (interesting information: https://www.youtube.com/watch?v=5t6deOZloBU)